
1. useEffect
1) SideEffect
- react의 메인 업무: UI를 렌더링하고 사용자에 반응하여 리렌더링한다.
- JSX 코드와 DOM을 평가하고 렌더링한다.
- state와 props를 관리한다.
- SideEffect: 애플리케이션에서 일어나는 다른 모든 것
- 화면에 렌더링하는 것을 제외하고 애플리케이션에서 일어나는 다른 모든 일
- ex) http request를 보내는 것
- ex) 로컬 스토리지에 저장하는 것
SideEffect는 직접적으로 컴포넌트 함수에 들어가면 안된다. 버그나 무한 루프가 발생할 수 있기 때문이다.
예를 들어, http 리퀘스트에 대한 응답으로 어떤 state를 변경한다면
- 리퀘스트를 보낸다.
- 리퀘스트를 받아 state를 변경한다.
- state를 변경하면 해당 컴포넌트를 다시 렌더링 한다.
- 재 렌더링 되었기에 다시 리퀘스트를 보낸다
- 무한 루프…
2) useEffect
React의 내장 훅으로 사이드 이펙트를 처리하는 데 사용한다.
1
2
3
4
5
6
7
8
useEffect(()=> {...}, [dependencies])

useEffect(() => {
  console.log('EFFECT RUNNING');
  return () => {
    console.log('EFFECT CLEANUP');
  };
}, []);
- 두 가지의 인수와 같이 호출된다.
- 함수: 모든 컴포넌트 평가 후에 실행되어야 하는 함수
- clean up함수를 반환한다.
- clean up 함수는 컴포넌트가 언마운트 될 때 실행된다.
- 혹은 다음 이펙트 함수가 실핼될 때 마다 클린 업 함수가 먼저 실행 되어 이전 이펙트를 정리한다.
- 지정된 의존성: 의존성으로 구성된 배열
- 함수: 모든 컴포넌트 평가 후에 실행되어야 하는 함수
- 지정된 의존성이 변경될 때마다 함수가 다시 실행된다.
- 컴포넌트 렌더링 주기 이후에 실행된다.
1
2
3
4
5
6
7
8
9
10
11
12
13
14
15
16
17
18
19
20
21
22
23
24
25
26
27
28
29
30
31
32
33
34
35
36
37
38
39
40
41
42
43
import React, { useState, useEffect } from 'react';

import Login from './components/Login/Login';
import Home from './components/Home/Home';
import MainHeader from './components/MainHeader/MainHeader';

function App() {
  const [isLoggedIn, setIsLoggedIn] = useState(false);

  // 모든 컴포넌트가 재평가된 후에 실행된다.
  // 혹은 의존성이 변경된 경우에만 실행된다.
  useEffect(() => {
    const storedUserLoggedInInformation = localStorage.getItem('isLoggedIn');

    if (storedUserLoggedInInformation === '1') {
      setIsLoggedIn(true);
    }
  }, []);

  const loginHandler = (email, password) => {
    // We should of course check email and password
    // But it's just a dummy/ demo anyways
    localStorage.setItem('isLoggedIn', '1');
    setIsLoggedIn(true);
  };

  const logoutHandler = () => {
    localStorage.removeItem('isLoggedIn');
    setIsLoggedIn(false);
  };

  return (
    <React.Fragment>
      <MainHeader isAuthenticated={isLoggedIn} onLogout={logoutHandler} />
      <main>
        {!isLoggedIn && <Login onLogin={loginHandler} />}
        {isLoggedIn && <Home onLogout={logoutHandler} />}
      </main>
    </React.Fragment>
  );
}

export default App;
- 의존성을 빈 배열로 설정하면, 의존성이 변경되는 경우가 없기 때문에 컴포넌트가 재평가된 후에 실행된다.
- 즉, 실제로 해당 컴포넌트가 렌더링될 때 한 번만 실행된다. (의존성이 절대 변경되지 않기 때문이다)
3) 의존성
1
2
3
4
5
6
7
8
9
10
11
12
13
14
15
16
17
18
19
20
21
22
23
24
25
26
27
28
29
30
31
32
33
34
35
36
37
38
39
40
41
42
43
44
45
46
47
48
49
50
51
52
53
54
55
56
57
58
59
60
61
62
63
64
65
66
67
68
69
70
71
72
73
import React, { useState, useEffect } from 'react';

import Card from '../UI/Card/Card';
import classes from './Login.module.css';
import Button from '../UI/Button/Button';

const Login = (props) => {
  const [enteredEmail, setEnteredEmail] = useState('');
  const [emailIsValid, setEmailIsValid] = useState();
  const [formIsValid, setFormIsValid] = useState(false);

  // 입련된 값이 변경되면, 유효성 검사를 다시 실행한다.
  useEffect(() => {
    setFormIsValid(
      enteredEmail.includes('@') && enteredPassword.trim().length > 6
    );
  }, [enteredEmail, enteredPassword]);

  const emailChangeHandler = (event) => {
    setEnteredEmail(event.target.value);
  };

  const passwordChangeHandler = (event) => {
    setEnteredPassword(event.target.value);
  };

  const submitHandler = (event) => {
    event.preventDefault();
    props.onLogin(enteredEmail, enteredPassword);
  };

  return (
    <Card className={classes.login}>
      <form onSubmit={submitHandler}>
        <div
          className={`${classes.control} ${
            emailIsValid === false ? classes.invalid : ''
          }`}
        >
          <label htmlFor="email">E-Mail</label>
          <input
            type="email"
            id="email"
            value={enteredEmail}
            onChange={emailChangeHandler}
            onBlur={validateEmailHandler}
          />
        </div>
        <div
          className={`${classes.control} ${
            passwordIsValid === false ? classes.invalid : ''
          }`}
        >
          <label htmlFor="password">Password</label>
          <input
            type="password"
            id="password"
            value={enteredPassword}
            onChange={passwordChangeHandler}
            onBlur={validatePasswordHandler}
          />
        </div>
        <div className={classes.actions}>
          <Button type="submit" className={classes.btn} disabled={!formIsValid}>
            Login
          </Button>
        </div>
      </form>
    </Card>
  );
};

export default Login;
- 이제 useEffect 함수는 enteredEmail 또는 enteredPassword가 바뀔 때마다 다시 실행된다.
- 일반적으로 특정 데이터, 예를 들어 어떤 state나 프롭이 변경될 때 로직을 다시 실행하기 위해서도 사용된다.
- 어떤 액션에 대한 응답으로 실행되는 액션이 있다면 그것은 사이드이펙트이다.
4) clean up
과도한 함수 실행을 막기 위해, 디바운싱을 할 수 있다.
키보드를 입력할 때마다 함수를 실행하면, 과도한 함수 실행이 될 수 있다.
그래서 키보드를 입력 후, 특정 시간이 지나도 다시 키보드 입력이 발생하지 않으면 키보드 입력이 끝난 것으로 인식하고 함수를 실행 시키는 로직을 구현할 수 있다.
1
2
3
4
5
6
7
8
9
10
11
12
13
// 위의 useEffect를 다음과 같이 수정할 수 있다.
  useEffect(() => {
    const identifier = setTimeout(() => {
      setFormIsValid(
        enteredEmail.includes('@') && enteredPassword.trim().length > 6
      );
    }, 500);

   // clean up 함수
    return () => {
      clearTimeout(identifier);
    };
  }, [enteredEmail, enteredPassword]);
setTimeout은 일정 시간이 지난 후에 함수가 실행되도록 처리하는 역할을 한다.
clearTimeout은 setTimeout을 취소하는 역할을 한다.
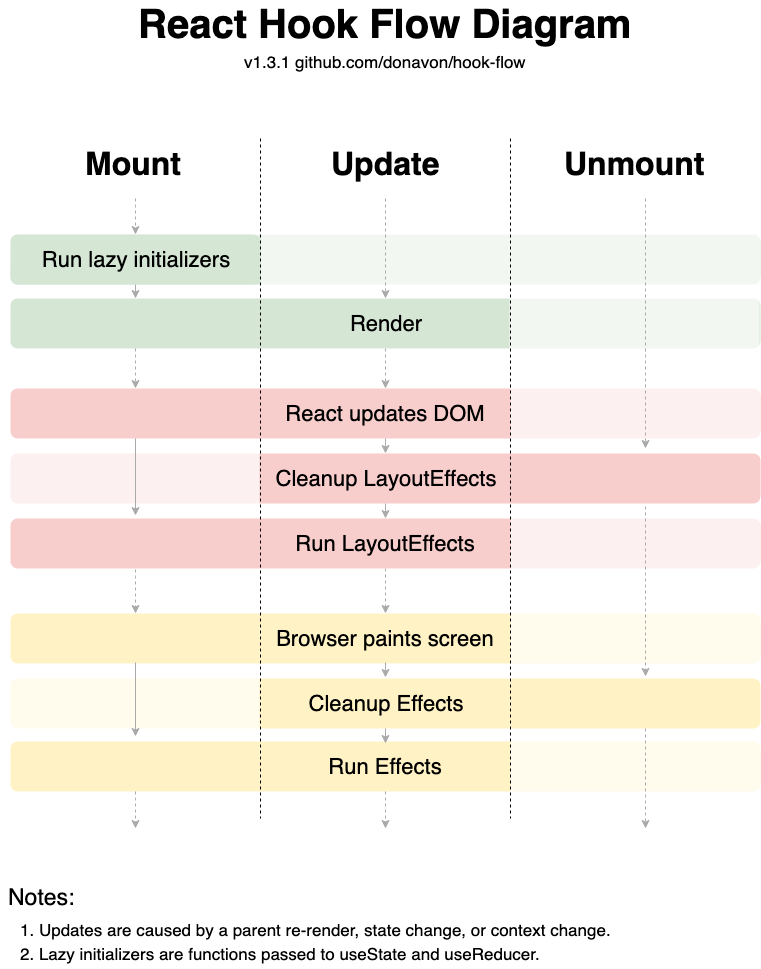
- useEffect와 유사한 useLayoutEffect()라는 훅이 존재한다. 둘의 차이는 함수가 실행되는 시기의 차이이다.
- useLayOutEffect(): Dom에 렌더링 되고 페인팅 되기 직전에 실행
- useEffect(): 페인팅 이후 실행
2. useReducer
state관리를 도와주는 훅이다.
state가 복잡하다면 useReducer()를 사용할 수 있다.
1) useReducer()
1
const [state, dispatchFn] = useReducer(reducerFn, initialState, initFn);
- state: 최신의 state 값
- dispatchFn: action을 dispatch 한다.
- reducerFn: 최근 state를 가져오는 함수
- dispatch 요청을 감지후 상태, 액션을 전달받아 조건 처리한 다음 결과 값으로 상태를 반환한다.
- action은 type을 가진 자바스크립트 객체의 형태로 필요한 경우 payload를 전달할 수 있다.
- (prevState, action) => newState
- initialState: 초기 값
- initFn: 초기 state를 설정하기 위해 실행하는 함수
1
2
3
4
5
6
7
8
9
10
11
12
13
14
15
16
17
18
19
20
21
22
23
24
25
26
27
28
29
30
31
32
33
34
35
36
37
38
39
40
41
42
43
44
45
46
47
48
49
50
51
52
53
54
55
56
57
58
59
60
61
62
63
64
65
66
67
68
69
70
71
72
73
74
75
76
77
78
79
80
81
82
83
84
85
86
87
88
89
90
91
92
93
94
95
96
97
98
99
100
101
102
103
104
105
106
107
108
109
110
111
112
113
114
115
116
117
118
119
120
121
122
import React, { useState, useEffect, useReducer } from 'react';

import Card from '../UI/Card/Card';
import classes from './Login.module.css';
import Button from '../UI/Button/Button';

// reducerFn: 새로운 state를 반환한다.
const emailReducer = (state, action) => {
  if (action.type === 'USER_INPUT') {
    return { value: action.val, isValid: action.val.includes('@') };
  }
  if (action.type === 'INPUT_BLUR') {
    return { value: state.value, isValid: state.value.includes('@') };
  }
  return { value: '', isValid: false };
};

const passwordReducer = (state, action) => {
  if (action.type === 'USER_INPUT') {
    return { value: action.val, isValid: action.val.trim().length > 6 };
  }
  if (action.type === 'INPUT_BLUR') {
    return { value: state.value, isValid: state.value.trim().length > 6 };
  }
  return { value: '', isValid: false };
};

const Login = (props) => {
  const [formIsValid, setFormIsValid] = useState(false);

 // useReducer 활용
  const [emailState, dispatchEmail] = useReducer(emailReducer, {
    value: '',
    isValid: null,
  });

  const [passwordState, dispatchPassword] = useReducer(passwordReducer, {
    value: '',
    isValid: null,
  });


  const emailChangeHandler = (event) => {
    // 값을 업데이트 할 때, dispatch.
    dispatchEmail({type: 'USER_INPUT', val: event.target.value});
  };

  const passwordChangeHandler = (event) => {
    // 값을 업데이트 할 때, dispatch.
    dispatchPassword({ type: 'USER_INPUT', val: event.target.value
  };

  const validateEmailHandler = () => {
    dispatchEmail({type: 'INPUT_BLUR'});
  };

  const validatePasswordHandler = () => {
    dispatchPassword({ type: 'INPUT_BLUR' });
  };


  // useEffect
  const { isValid: emailIsValid } = emailState;
  const { isValid: passwordIsValid } = passwordState;

  useEffect(() => {
    const identifier = setTimeout(() => {
      setFormIsValid(emailIsValid && passwordIsValid);
    }, 500);

    return () => {
      clearTimeout(identifier);
    };
  }, [emailIsValid, passwordIsValid]);

  const submitHandler = (event) => {
    event.preventDefault();
    props.onLogin(emailState.value, enteredPassword);
  };

  return (
    <Card className={classes.login}>
      <form onSubmit={submitHandler}>
        <div
          className={`${classes.control} ${
            emailState.isValid === false ? classes.invalid : ''
          }`}
        >
          <label htmlFor="email">E-Mail</label>
          <input
            type="email"
            id="email"
            value={emailState.value}
            onChange={emailChangeHandler}
            onBlur={validateEmailHandler}
          />
        </div>
        <div
          className={`${classes.control} ${
            passwordIsValid === false ? classes.invalid : ''
          }`}
        >
          <label htmlFor="password">Password</label>
          <input
            type="password"
            id="password"
            value={enteredPassword}
            onChange={passwordChangeHandler}
            onBlur={validatePasswordHandler}
          />
        </div>
        <div className={classes.actions}>
          <Button type="submit" className={classes.btn} disabled={!formIsValid}>
            Login
          </Button>
        </div>
      </form>
    </Card>
  );
};

export default Login;
- 개별 state를 관리하는 데에는
useState()가 적합하다. - 연관된 state 조각으로 구성된 state 관련 데이터를 다루면
useReducer()사용이 편하다.
3. useContext
useContext는 vue3의 provide/inject와 유사한 개념이다.
1) Props 드릴링
일반적으로 데이터는 props를 통해 컴포넌트에 전달된다. 프로젝트의 사이즈가 커지면 props를 전달하는 경로가 길어질 수 있다.
앱의 규모가 커지고 컴포넌트 트리의 중첩도가 깊어짐에 따라 상태 관리가 어려워진다. props를 아래 방향으로 한 단계씩 전달 하기 때문에 불필요하게 중간에서 전달 받아 다시 아래 방향으로 전달하는 경우도 빈번하게 발생하게 된다.
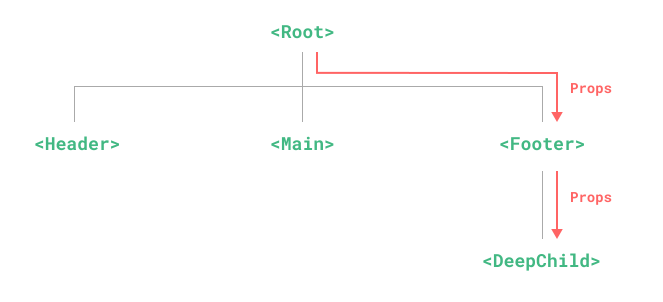
- useContext는 props를 실제로 필요한 컴포넌트에서만 사용할 수 있도록 한다.
- 이를 위해 컴포넌트 전체에 사용할 수 있는 리액트에 내장된 내부적인 state 저장소가 존재한다.
- 이를 사용하면 긴 props 체인없이 관련된 컴포넌트에 직접 전달할 수 있다.
2) contextAPI
Store 생성
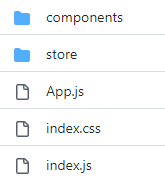
- 파일 이름을 케밥케이스의 형태로 저장한다.
- store > auth-context.js
- 파스칼 형태로 저장하면 컴포넌트와 헷갈릴 수 있기 때문이다.
1
2
3
4
5
6
7
8
9
10
// src/store/auth-context.js

import React from 'react';

const AuthContext = React.createContext({
  isLoggedIn: false
  onLogout: () => {}
});

export default AuthContext;
createContext: 컨텍스트 객체를 생성한다.- 컴포넌트가 되거나 컴포넌트를 포함하는 객체가 된다.
컨텍스트 공급자
1
2
3
4
5
6
7
8
9
10
11
12
13
14
15
16
17
18
19
20
21
22
23
24
25
26
27
28
29
30
31
32
33
// src/App.js

import React, { useState, useEffect } from 'react';
import Login from './components/Login/Login';
import Home from './components/Home/Home';
import MainHeader from './components/MainHeader/MainHeader';
import AuthContext from './store/auth-context';


function App() {
  const [isLoggedIn, setIsLoggedIn] = useState(false);
  const logoutHandler = () => {
    localStorage.removeItem('isLoggedIn');
    setIsLoggedIn(false);
  };

// ... 생략
  return (
    <AuthContext.Provider
      value=
    >
      <MainHeader />
      <main>
        {!isLoggedIn && <Login onLogin={loginHandler} />}
        {isLoggedIn && <Home onLogout={logoutHandler} />}
      </main>
    </AuthContext.Provider>
  );
}


export default App;
- 생성된 컨텍스트 객체는 Provider 컴포넌트를 포함하여 이 컴포넌트를 통해 하위 컴포넌트에게 값을 공급한다.
- JSX로 감싸서 값을 공급한다. 감싸지지 않은 컴포넌트는 리스닝할 수 없다.
- value로 context에 저장된 값을 전달한다. (모든 자식 컴포넌트에서 리스닝할 수 있다.)
- 컴포넌트에서 context를 업데이트 해야 할 때가 있다. 그럴 때는 context를 통해 매서드를 보내면 된다.
- 변경이 잦은 경우에는, 리액트 컨텍스트는 그다지 적합하지 않다.
컨텍스트 수요자
1
2
3
4
5
6
7
8
9
10
11
12
13
14
15
16
17
18
19
20
import React, { useContext } from 'react';

import AuthContext from '../../store/auth-context';
import classes from './Navigation.module.css';

const Navigation = (props) => {
  const ctx = useContext(AuthContext);

  return (
    <AuthContext.Consumer>
      {(context)=> {
        return (
          // 반환하는 JSX 코드
        )
      }}
    </AuthContext.Consumer>
  );
};

export default Navigation;
- 콜백함수의 매개변수로 context가 전달되고 이를 사용할 수 있다.
- useContext를 사용하면 더 깔끔하게 코딩이 가능하다.
3) useContext
useContext는 컨텍스트를 활용하고 리스닝할 수 있게 해준다.
1
2
3
4
5
6
7
8
9
10
11
12
13
14
15
16
17
18
19
20
21
22
23
24
25
26
27
28
29
30
import React, { useContext } from 'react';
import classes from './Navigation.module.css';

const Navigation = (props) => {
  const ctx = useContext(AuthContext);

  return (
    <nav className={classes.nav}>
      <ul>
        {ctx.isLoggedIn && (
          <li>
            <a href="/">Users</a>
          </li>
        )}
        {ctx.isLoggedIn && (
          <li>
            <a href="/">Admin</a>
          </li>
        )}
        {ctx.isLoggedIn && (
          <li>
            <button onClick={props.onLogout}>Logout</button>
          </li>
        )}
      </ul>
    </nav>
  );
};

export default Navigation;
4) provider 컴포넌트
많은 로직을 사용할 경우, provider 컴포넌트를 구현하여 사용할 수 있다.
1
2
3
4
5
6
7
8
9
10
11
12
13
14
15
16
17
18
19
20
21
22
23
24
25
26
27
28
29
30
31
32
33
34
35
36
37
38
39
import React, { useState, useEffect } from 'react';

const AuthContext = React.createContext({
  isLoggedIn: false,
  onLogout: () => {},
  onLogin: (email, password) => {}
});

export const AuthContextProvider = (props) => {
  const [isLoggedIn, setIsLoggedIn] = useState(false);

  useEffect(() => {
    const storedUserLoggedInInformation = localStorage.getItem('isLoggedIn');

    if (storedUserLoggedInInformation === '1') {
      setIsLoggedIn(true);
    }
  }, []);

  const logoutHandler = () => {
    localStorage.removeItem('isLoggedIn');
    setIsLoggedIn(false);
  };

  const loginHandler = () => {
    localStorage.setItem('isLoggedIn', '1');
    setIsLoggedIn(true);
  };

  return (
    <AuthContext.Provider
      value=
    >
      {props.children}
    </AuthContext.Provider>
  );
};

export default AuthContext;
관련 state를 이 별도의 공급자 컴포넌트에서 관리한다.
AuthContextProvider 컴포넌트에서 전체 로그인 state를 관리할 수도 있다.
- 한 곳에 다 모여있기 때문에 앱 컴포넌트가 더 간결해진다.
1
2
3
4
5
6
7
8
9
10
11
12
13
14
15
16
17
18
19
20
21
22
23
24
// src/app.js

import React, { useContext } from 'react';

import Login from './components/Login/Login';
import Home from './components/Home/Home';
import MainHeader from './components/MainHeader/MainHeader';
import AuthContext from './store/auth-context';

function App() {
  const ctx = useContext(AuthContext);

  return (
    <React.Fragment>
      <MainHeader />
      <main>
        {!ctx.isLoggedIn && <Login />}
        {ctx.isLoggedIn && <Home />}
      </main>
    </React.Fragment>
  );
}

export default App;
1
2
3
4
5
6
7
8
9
10
11
12
13
14
15
// src/index.js

import React from 'react';
import ReactDOM from 'react-dom/client';

import './index.css';
import App from './App';
import { AuthContextProvider } from './store/auth-context';

const root = ReactDOM.createRoot(document.getElementById('root'));
root.render(
  <AuthContextProvider>
    <App />
  </AuthContextProvider>
);