
1. Redux란
1) 정의
React의 상태 관리 시스템이다.
React의 상태는 세 가지 이다.
- 로컬 상태: 하나의 컴포넌트와 연결된 State
- useState를 사용하여 컴포넌트 안에서 로컬 상태를 관리한다.
- 크로스 컴포넌트 상태: 다수의 컴포넌트에 영향을 미치는 State
- props체인을 구축하여 컴포넌트 간 State를 통신한다.
- 앱 와이드 상태: 애플리케이션의 모든 컴포넌트에 영향을 미치는 State
리액트 Context를 통해 크로스 컴포넌트 상태나 앱 와이드 상태를 쉽게 관리하도록 한다. 리덕스도 마찬가지이다.
모든 상태 변경은 Store에서 관리하며 Store의 상태를 변경하는 유일한 방법을 Action객체를 전달하는 방법 뿐이다. 그러므로 예측 불가능한 상태 변경이 발생하는 것을 막을 수 있다.
Action은 엄격한 순서에 의해 동기적으로 실행되므로 관리가 용이하다. 또한, Action객체는 자바스크립트의 객체이므로 기로깅 가능하고 시리얼라이즈 할 수 있다는 특징이 있다.
2) 필요성
리액트 Context에는 잠재적인 단점이 있다.
- 대형 프로젝트의 경우 상태관리가 매우 복잡하다. 다음과 같은 코드가 나올 수도 있다.
1
2
3
4
5
6
7
8
9
10
// 다양하고 많은 ContextProvider가 구축된다.
return (
  <AuthContextProvider>
    <ThemeContextProvider>
      <MultiStepFormContextProvider>
        <MYserRegistration />
      </MultiStepFormContextProvider>
    </ThemeContextProvider>
  </AuthContextProvider>
)
- 하나의 컨텍스트만 사용한다 하더라도,
ContextProvider컴포넌트 하나가 다양하고 많은 것을 관리해야 하기 때문에 그 자체를 유지하기가 어려울 수 있다. - 데이터가 자주 변경되는 경우, 성능이 좋지 않다. 반면에 리덕스는 유동적인 상태 관리 라이브러리이다.
3) 작동 방식
리덕스는 하나의 중앙 데이터(상태) 저장소 이다.
한 저장소에 전체 애플리케이션의 모든 상태를 저장한다. 그럼에도 관리가 쉬운 이유는 저장소 전체를 항상 직접 관리할 필요가 없기 때문이다.
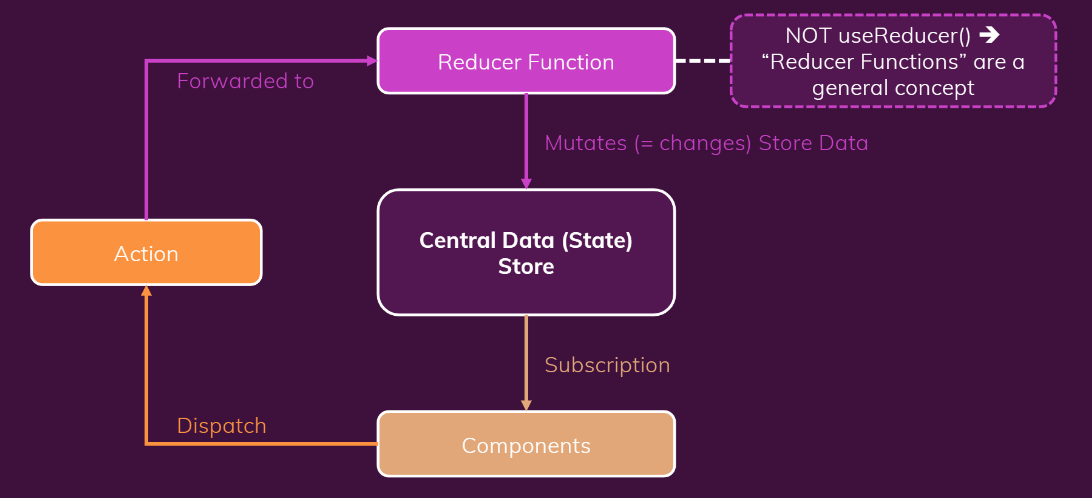
- 컴포넌트가 저장소를 구독하고 데이터가 변경될 때마다 Store가 컴포넌트에 알려준다. 그러면 컴포넌트는 필요한 데이터를 받게 된다.
- 여기서 중요한 규칙이 있다. 절대로 저장된 데이터를 직접 조작하지 않는다. 데이터는 절대로 반대 방향으로 흐르지 않는다.
- 리듀서 함수가 저장소 데이터의 업데이트를 담당한다. 리듀서가 해야하는 작업을 액션이라고 부르며, 컴포넌트가 특정 액션객체를 dispatch한다.
- action을 전달받은 reducer는 상태를 수정하여 Store를 업데이트 한다.
즉, 직접 업데이트 하지 않고, 액션에는 수행해야 할 작업이 설명되어 있고 이 액션들을 리듀서로 전달해서 리듀서가 수행한다.
그 후, 리듀서는 새로운 상태를 도출하고 이것이 중앙 데이터 저장소의 기존 상태를 대체하게 된다. 데이터 저장소의 상태가 업데이트 되면 구독중인 컴포넌트가 알림을 받게 되어 컴포넌트를 업데이트하게 되는 것이다.
2. Redux 기초
1) Redux 메서드
1
$ npm install redux react-redux
1
2
3
4
5
6
7
8
9
10
11
12
13
14
15
16
17
18
19
20
21
22
23
24
25
26
27
28
29
30
31
32
33
34
35
36
37
38
39
40
41
42
43
interface Store {
   getState(): State;
   dispatch(action: Action): Dispatch;
   subscribe(listener: Listener): Unsubscribe;
   replaceReducer(nextReducer: Reducer): void;
}

// redux의 주요 메서드를 직접 구현해보기
const createStore = (reducer, preloadedState, enhancer) => {
   if (!reducer || typeof reducer !== "function") throw new Error("...")


  // 외부에서 접근이 불가능한 상태
  let state = preloadedState ?? {};
  const listeners = [];

  const getState = () => state;

  // reducer를 통해서만 state를 업데이트 한다.
  const dispatch = (action) => {
    if(!("type" in action)) throw new Error ("...");

    state = reducer(getState(), action);
    listeners.forEach(listener => listener());
  }

  const subscribe = (listener) => {
    listeners.push(listener);
    return {
      function unscribe() {
          listeners.filter((l) => !Object.is(l, listener));
      }
    }
  }


  // store 객체를 반환한다.
  return {
      getState,
      dispatch
      subscribe
  }
};
| 메서드 | 설명 |
|---|---|
| const store = redux.createStore(reducer, [초기 상태]) | store와 reducer를 연결하여 store를 생성한다. store객체를 반환한다.store는 앱의 전체 상태를 가지고 있는 객체이다. 이 객체의 상태를 바꾸는 유일한 방법은 action을 보내는 것이다. UI를 업데이트 하기위해 상태를 구독할 수도 있다. |
| store.getState() | 현재 State를 가져온다. |
| store.subscribe(listener) | 변경사항에 대한 리스터를 추가한다. 구독을 취소하는 함수를 반환한다. 리스너는 State가 변경될 때 호출된다. 콜백 안에서 현재 상태 트리를 읽으려면 getState()를 호출하면 된다. |
| store.dispatch(action) | 리듀서에 action을 보낸다. |
2) 시작 하기
1
2
3
4
5
6
7
8
9
10
11
12
13
14
15
16
17
18
19
20
21
22
23
24
25
26
27
28
29
30
31
32
33
34
35
36
37
38
39
40
41
42
43
const redux = require("redux");

// 새로운 상태 스냅샷을 도출하는 리듀서 함수
// 인자로 oldState와 DispatchedAction을 받는다.
// 최초 실행시, state의 값이 있게 하기 위해 기본값이 필요하다.
// 새로운 State 객체를 return 한다.
const counterReducer = (state = {counter: 0}, action) => {
 if (action.type === "increment") {
    return {
      counter: state.counter + 1,
    };
  }

  if (action.type === "decrement") {
    return {
      counter: state.counter - 1,
    }
  }

  return state
};


// 저장소를 생성하는 메서드
// 어떤 reducer가 해당 저장소의 데이터를 조작하는 지 기입한다.
const store = redux.createStore(counterReducer);


// getState()는 createState()로 생성된 저장소에서 사용할 수 있는 메서드 이다.
// 업데이트 후에 최신 스냅샷을 제공한다.
const counterSubscriber = () => {
  const latestState = store.getState();
    console.log(latestState)
}

// Redux가 구독 함수를 인식하고 상태가 변경할 떄 마다 해당 함수를 실행하라고 알려준다.
// subscribe(listener) => unsubscribe
store.subscribe(counterSubscriber);


// action을 발송한다.
store.dispatch({type: "increment"})
sotre.dispatch({type: "decrement"})
- 리듀서 함수는 순수 함수여야 한다.
- 순수 함수: 동일한 인자가 주어졌을 때 항상 동일한 결과를 반환하고 외부의 상태를 변경하지 않는다.
- 즉, 순수 함수는 함수 내 변수 외에 외부 값을 참조, 의존하거나 변경하지 않아야 한다.
- Redux의 State는 불변해야 한다. 즉 State가 수정되서는 안되기 때문에 순수 함수여야 하는 것이다.
- 인자로 들어온 State를 수정하지 않고, State를 새로 할당하는 이유이다.
- 이전의 State와 다른 주소 값을 가지고 있기 때문에 State가 변경되었다고 판단하는 것이다.
1
2
3
4
5
6
7
8
9
10
11
12
13
// 순수 함수
function double(z) {
   return z*z
}

// 순수 함수
const squareAll = (items) => items.map(square);

// 비순수 함수
function double(z) {
  fetchUpdate(z) // side effect: 부수 효과
  return z * z
}
3) 예시
✅ Store 생성한다.
1
2
3
4
5
6
7
8
9
10
11
12
13
14
15
16
17
18
19
20
21
22
23
24
// src/store/index.js

import { createStore } from 'redux';

const counterReducer = (state = { counter: 0 }, action) => {
  if (action.type === 'increment') {
    return {
      counter: state.counter + 1,
    };
  }

  if (action.type === 'decrement') {
    return {
      counter: state.counter - 1,
    };
  }

  return state;
};

const store = createStore(counterReducer);

// store를 내보낸다.
export default store;
reducer(prevState, actionObject){}: 이전 State와 action객체를 인자로 받는다.- action을 식별하기 위해 type 속성을 사용한다.
✅ Store 앱과 연결한다.
1
2
3
4
5
6
7
8
9
10
11
12
13
14
15
16
// src/index.js

import React from 'react';
import ReactDOM from 'react-dom/client';
import { Provider } from 'react-redux';

import './index.css';
import App from './App';
import store from './store/index';

const root = ReactDOM.createRoot(document.getElementById('root'));
root.render(
  <Provider store={store}>
    <App />
  </Provider>
);
- 래핑된 컴포넌트만이 리덕스에 접근할 수 있다.
- 래핑된 컴포넌트의 자식. 자손 컴포넌트도 접근이 가능하다.
✅ 컴포넌트에서 Store에 있는 State를 구독한다.
1
2
3
4
5
6
7
8
9
10
11
12
13
14
15
// src/components/counter.js
import { useSelector } from 'react-redux';

// 구독
const Counter = () => {
  const counter = useSelector(state => state.counter);

  return (
    <main>
      <div>{counter}</div>
    </main>
  );
};

export default Counter;
useStore: 스토어에 바로 접근한다.useSelector: 자동으로 스토어가 관리하는 상태를 일부 선택하게 한다.- 전체 상태 객체에서 일부만 받을 수 있다.
- 컴포넌트가 스토어의 특정 State에 구독 => 스토어가 업데이트 되면 자동으로 컴포넌트도 업데이트 된다.
✅ Store에 있는 State를 업데이트 하기 위해 action을 dispatch 한다.
1
2
3
4
5
6
7
8
9
10
11
12
13
14
15
16
17
18
19
20
21
22
23
24
25
26
27
28
// src/components/counter.js

import { useSelector, useDispatch } from 'react-redux';

const Counter = () => {
  const dispatch = useDispatch();
  const counter = useSelector(state => state.counter);

  const incrementHandler = () => {
    dispatch({ type: 'increment' });
  };

  const decrementHandler = () => {
    dispatch({ type: 'decrement' });
  };

  return (
    <main>
      <div>{counter}</div>
      <div>
        <button onClick={incrementHandler}>Increment</button>
        <button onClick={decrementHandler}>Decrement</button>
      </div>
    </main>
  );
};

export default Counter;
- useDispatch: 실행할 수 있는 dispatch function을 반환한다.
- dispatch함수를 통해 action객체를 리듀서에 전달한다.
4) action에 페이로드 연결하기
1
2
3
4
5
6
7
8
9
10
11
12
13
14
15
16
17
18
19
20
21
22
23
24
25
26
27
28
29
30
31
// src/store/index.js

import { createStore } from 'redux';

const initialState = { counter: 0, showCounter: true };

const counterReducer = (state = initialState, action) => {

  // payload를 사용하여 코드의 중복을 막는다.
  if (action.type === 'increase') {

   // 새로운 state객체를 반환한다.
   return {
      counter: state.counter + action.amount,
      showCounter: state.showCounter
    };
  }

  if (action.type === 'toggle') {
    return {
      showCounter: !state.showCounter,
      counter: state.counter
    };
  }

  return state;
};

const store = createStore(counterReducer);

export default store;
- 중요한 것은 기존 state와 병합되지 않고 기존 state를 덮어쓴다는 것이다.
- 원본의 state를 절대 변경해서는 안된다. 새로운 state객체를 반환하여 재정의해야 한다.
- 절대 기존의 객체 속성이 변경되게 해서는 안된다.
1
2
3
4
5
6
7
8
9
10
11
12
13
14
15
16
17
18
19
20
21
22
23
24
25
26
27
28
29
30
// src/components/counter.js

import { useSelector, useDispatch } from 'react-redux';

const Counter = () => {
  const dispatch = useDispatch();
  const counter = useSelector((state) => state.counter);
  const show = useSelector((state) => state.showCounter);

  // payload를 전달한다.
  const increaseHandler = () => {
    dispatch({ type: 'increase', amount: 10 });
  };

  const toggleCounterHandler = () => {
    dispatch({ type: 'toggle' });
  };

  return (
    <main>
      {show && <div>{counter}</div>}
      <div>
        <button onClick={increaseHandler}>Increment</button>
      </div>
      <button onClick={toggleCounterHandler}>Toggle Counter</button>
    </main>
  );
};

export default Counter;
- payload를 전달하여 리듀서 함수를 좀 더 간편하게 사용할 수 있다.
3. Redux Toolkit
리덕스를 더 쉽고 편리하게 사용할 수 있게 하는 추가 패키지이다.
1) 필요성
- 프로젝트 규모가 더 커지면 리덕스에서 관리해야 하는 상태가 많아져 복잡해진다.
action타입이 너무 다양져서 관리가 어렵다.- 상태 객체가 너무 커진다. (ActionType, ActionCreator, Reducer 등.. )
- 리덕스는 항상 새로운 상태를 반환해야 하는데 상태에 중첩된 데이터가 많아 복잡할 경우 관리가 어렵다.
2) 메서드
1
2
3
4
5
6
7
8
9
10
11
12
13
14
15
16
17
18
19
20
21
22
23
24
25
26
27
28
29
30
31
32
33
34
35
36
37
38
39
40
41
42
43
44
45
46
47
48
49
50
51
52
53
54
55
56
57
58
59
60
61
62
63
64
65
66
67
68
69
70
71
72
73
74
75
76
77
78
79
80
// 1. createAction
function createAction(type, prepareFn) {
  const action = { type };
  const actionCreator = (payload) => {
    if (payload) action.payload = payload;
    const preapreAction = prepareFn?.(payload) ?? {};
    return { ...action, ...preapreAction };
  };
  actionCreator.type = type;
  actionCreator.toString = () => type;
  return actionCreator;
}

export default createAction;


// 예시: no RTK
const INCREASE_NUMBER = "counter/increase";
const increaseNumber = () => ({
   type: INCREASE_NUMBER,
   payload
})

// 예시: RTK
// createAction을 사용하면 type, action 정의를 간편히 할 수 있다.
const increaseNumber = createAction("counter/increase");


//2. createReducer
function createReducer(initialState, reducers) {
  const combinedReducer = (state = initialState, action) => {
    const reducersPathValue = Object.entries(reducers);
    let index = reducersPathValue.findIndex(
      ([reducerPath]) => reducerPath === action.type
    );
    if (index > -1) {
      const reducer = reducersPathValue[index][1];
      return reducer(state[action.type], action);
    } else {
      return state;
    }
  };
  return combinedReducer;
}

export default createReducer;

// 예시
const counterReducer = createReducer(
  // 초기 값
  {counter: 0},

  // reducer 함수 객체
  {
    [increase.type]: (state, action)=> {
       state.counter = state.counter + action.payload;
    }
  }

)


//3. createSlice
import createAction from './createAction';
import createReducer from './createReducer';

function createSlice({ name, initialState, reducers }) {
  const slice = {
    actions: Object.keys(reducers).reduce(
      (actions, reducerPath) =>
        (actions[reducerPath] = createAction(reducerPath)),
      {}
    ),
    reducer: createReducer({ [name]: initialState }, reducers),
  };

  return slice;
}

export default createSlice;
| 메서드 | 설명 |
|---|---|
createActions() | action type, action creator를 간편하게 생성한다. |
createReducer() | initialState, reducer를 간편하게 생성한다. immer라이브러리를 사용해서 mutation이 가능하다. |
createSlice() | action type, action creator, initialState, reducer를 간편하게 생성한다. immer라이브러리를 사용해서 mutation이 가능하다. actions와 reducer가 있는 객체를 반환한다. |
3) 시작하기
1
2
3
4
$ npm install @reduxjs/toolkit

# 리덕스 툴킷에 이미 리덕스가 설치되어 있다.
$ npm uninstall redux
1
2
3
4
5
6
7
8
9
10
11
12
13
14
15
16
17
18
19
20
21
22
23
24
25
26
27
28
29
30
31
32
33
// src/store/index.js

import { createSlice, configureStore } from '@reduxjs/toolkit';

const initialCounterState = { counter: 0, showCounter: true };

// slice는 식별하기 위한 이름과 초기 상태, 리듀서가 필요하다.
const counterSlice = createSlice({
  name: 'counter',
  initialState: initialCounterState,
  reducers: {
    increase(state, action) {
      // 여전히 기존 상태를 변경할 수 없다.
      // redux는 immer라는 패키지를 사용하는데, 이런 코드를 감지하고 자동으로 원래 상태를 복제하여 새로운 상태 객체를 생성하여 오버라이드한다.
      state.counter = state.counter + action.payload;
    },
    toggleCounter(state) {
      state.showCounter = !state.showCounter;
    },
  },
});

// reducer를 store와 연결한다.
// key로 reducer를 매핑한다.
const store = configureStore({
  reducer: {counter: counterSlice.reducer}
});

// 액션을 export (오타 방지)
// dispatch(actionCreator(payload))를 위해 export!
export const counterActions = counterSlice.actions;

export default store;
createSlice({name: 이름, initialState: 초기값, reducer:{리듀서}})- Reducer를 조각낸다.
- initialState, reducer, action type, action creators를 한 번에 관리할 수 있도록 도와주는 함수이다.
- Reducer에 정의된 여기 이 메서드를 호출하면, Action 객체가 생성된다.
- 여러 개의 Reducer를 생성하여 기능 별로 관리하고 이를 Store와 연결한다.
- 이외에도 createAction, createReducer함수가 있지만 createSlice로 통합해서 관리하는 것이 편하다.
1
2
3
4
5
6
7
8
9
10
11
12
13
14
15
16
17
18
19
20
21
22
23
24
25
26
27
28
29
30
31
32
33
// src/components/counter.js

import { useSelector, useDispatch } from 'react-redux';
import { counterActions } from '../store/index';

const Counter = () => {
  const dispatch = useDispatch();
  const counter = useSelector((state) => state.counter.counter);
  const show = useSelector((state) => state.counter.showCounter);


  const increaseHandler = () => {
    // increase()는 액션 객체를 자동으로 생성한다.
    // payload가 필요할 경우 인자로 넣으면 이를 참고하여 자동으로 액션 객체를 생성한다.
    dispatch(counterActions.increase(10)); // { type: SOME_UNIQUE_IDENTIFIER, payload: 10 }
  };

  const toggleCounterHandler = () => {
    dispatch(counterActions.toggleCounter());
  };

  return (
    <main>
      {show && <div>{counter}</div>}
      <div>
        <button onClick={increaseHandler}>Increment</button>
      </div>
      <button onClick={toggleCounterHandler}>Toggle Counter</button>
    </main>
  );
};

export default Counter;
2) 기능별로 파일 분할
기능에 따라 Slice를 분할하고 파일도 나눌 수 있다.
이렇게 할 경우, index.js에서 이들을 합쳐서 Store와 연결한다.
vuex와 마찬가지로 Redux도 기능에 따라 파일을 나눠서 관리하는 것이 편리하다. 파일마다 각자 집중하고 있는 것이 다르기때문에, 한 눈에 코드를 파악하기도 쉽다.
1
2
3
4
5
6
7
8
9
10
11
12
13
14
15
16
17
18
19
20
21
22
23
24
25
26
27
28
29
30
31
32
33
34
35
36
// src/store.index.js

import { configureStore } from '@reduxjs/toolkit';

import counterReducer from './counter';
import authReducer from './auth';


const store = configureStore({
  reducer: { counter: counterReducer, auth: authReducer },
});

export default store;

//===============================================================
// configureStore
import { combineReducers, createStore } from 'redux';
import { devToolsEnhancer } from '@redux-devtools/extension';

function configureStore({ reducer, preloadedState, devTools }) {
  let rootReducer;

  if (typeof reducer === 'function') {
    rootReducer = reducer;
  }

  if (reducer && !Array.isArray(reducer) && typeof reducer) {
    rootReducer = combineReducers(reducer);
  }

  const enhancer = devTools ? devToolsEnhancer() : undefined;

  return createStore(rootReducer, preloadedState, enhancer);
}

export default configureStore;
- index.js에서는 메인 스토어를 만드는데 집중한다.
- createStore, combineReducers가 없이 Reducer를 결합하고 Store를 생성할 수 있다.
- Redux 미들웨어 추가도 손쉬워졌다.