
섹션 5-1. 클래스
객체 지향과 클래스 개념은 코드에서 실제 개체 (entity)로 작업한다는 점이 중요하다.
객체 지향 방법으로 객체를 구성하면서 로직을 만들면 로직의 일부를 관리하는 객체로 분할 할 수 있다. 객체는 코드로 작업을 수행하면서 사용할 수 있는 구체적인 요소들, 데이터를 저장하고 메소드를 실행하기 위해 메소드를 저장하는 데 사용하는 데이터 구조이다.
클래스는 객체의 청사진이다. 클래스를 사용하여 객체의 형태, 포함해야 하는 데이터를 정의할 수 있다. 따라서, 객체는 클래스 내의 인스턴스이다. 이러한 클래스를 기반으로 하면 동일한 구조, 동일한 클래스를 기반으로 하는 동일한 메소드로 여러 객체르 빠르게 복제할 수 있다.
이처럼 클래스는 객체의 형태, 포함해야 할 속성와 메소드를 정의하는 데 큰 도움이 되고 클래스를 사용하여 동일한 구조와 메소드를 포함한 여러 객체를 쉽게 만들 수 있다. 단지, 객체에 저장된 정확한 데이터 세부 정보만 다를 뿐이다.
1) 클래스 생성
(1) 타입스크립트
1
2
3
4
5
6
7
8
9
10
11
12
13
14
15
16
// 클래스를 기반으로 만들 객체를 입력하고 마지막에 키가 갖게 될 값의 타입을 정의한다.

class Department {
  name: string;


  // 생성자 함수: 예약어로서 이 클래스와 연결된 객체가 생성되는 모든 객체에도 연결이 되는 함수이다.
  // 이를 활용하여 구축하는 객체에 대한 초기화 작업을 수행할 수 있다.
  constructor(n: string) {
    this.name = n;
  }
}

// 인스턴스 즉, 객체 만들기
const accounting = new Department("Accounting");
console.log(accounting)
✅ 결과

(2) 자바스크립트로의 컴파일
es6
1
2
3
4
5
6
7
8
9
10
11
"use strict";

class Department {
    constructor(n) {
        this.name = n;
    }
}

const accounting = new Department("Accounting");
console.log(accounting);
es5
1
2
3
4
5
6
7
8
9
10
11
12
13
"use strict";

var Department = /** @class */ (function () {
    function Department(n) {
        this.name = n;
    }
    return Department;
}());


var accounting = new Department("Accounting");
console.log(accounting);
2) 메서드 생성
1
2
3
4
5
6
7
8
9
10
11
12
13
14
15
16
17
18
19
20
21
class Department {
  name: string;
   // 생성자 메소드는 클래스를 인스턴스화할 때 호출하는 유틸리티 함수일 뿐이다.
  constructor(n: string) {
    this.name = n;
  }

  // 메서드
  // this: 일반적으로 생성된 클래스의 구체적인 인스턴스를 참조한다.
  describe(this: Department){
    console.log("Department: " + this.name);
  }
}

const accounting = new Department("Accounting");
accounting.describe(); // Department: Accounting

const accountingCopy = {describe: accounting.describe}

// 컴파일 오류가 발생하지는 않지만 this가 accountingCopy를 참조하기 때문에 해당 객체는 name속성 값이 없기 때문에 undefined가 나타난다.
accountingCopy.describe(); // Department: undefined
생성자 메서드는 클래스를 인스턴스화할 때 호출하는 유틸리티 함수일 뿐이다. 그 외에도 클래스의 인스턴스들이 사용할 수 있는 함수를 정의할 수 있다. 이는 메서드라 불린다. 위의 예시에서 describe메서드를 정의한 것을 알 수 있다.
accountingCopy에서 Department클래스에서 정의한 메서드를 실행하려고 보니, 우리가 의도한 것처럼 실행되지 않는 것을 알 수 있다. 이는 accountingCopy인스턴스가 name속성 값이 없기 때문에 발생하는 문제이이다. this가 accountingCopy를 참조하는데 해당 객체는 name속성 값이 없기 때문에 this.name이 undefined값을 갖게 되는 것이다.
타입스크립트는 메서드를 정의할 때, 매개변수에 타입안정성을 추가하여 위와 같은 상황을 막을 수 있다.
1
2
3
4
5
6
7
8
9
10
11
12
13
14
15
16
class Department {
  name: string;
  constructor(n: string) {
    this.name = n;
  }
  // 더미 매개변수를 추가하여 타입 안정성을 추가한다.
  describe(this: Department){
    console.log("Department: " + this.name);
  }
}

const accounting = new Department("Accounting");
accounting.describe(); // Department: Accounting

const accountingCopy = {describe: accounting.describe}
accountingCopy.describe(); // 컴파일 에러 발생

1
2
const accountingCopy = { name: 'n', describe: accounting.describe}
accountingCopy.describe();
위와 같이 수정해주면 더 이상 컴파일 에러가 발생하지 않는다.
2) 제어자
(1) 접근 제어자 (private와 public)
클래스를 통해 생성한 인스턴스의 속성에 접근하는 방법은 크게 두 가지이다.
- 클래스에서 생성한 메서드를 통해 접근하는 방법
- 직접 속성에 접근하는 방법이다.
기본적으로는 위의 두 가지 방식으로 모두 접근할 수 있지만, private키워드를 사용할 경우 전자의 방법으로만 속성에 접근할 수 있다.
1
2
3
4
5
6
7
8
9
10
11
12
13
14
15
16
17
18
19
20
21
22
23
24
25
26
27
28
29
30
class Department {
  // public은 defult이기 때문에 굳이 기입할 필요는 없다.
  public name: string;

  // private의 의미는 employees가 이제 클래스 즉, 생성된 객체 내부에서만 접근할 수 있는 속성이 되었다는 의미이다.
  private employees: string[] = [];

  constructor(n: string) {
    this.name = n;
  }
  describe(this: Department) {
    console.log("Department: " + this.name);
  }
  addEmployee(employee: string) {
    this.employees.push(employee);
  }

  printEmployeeInformation() {
    console.log(this.employees.length);
    console.log(this.employees);
  }
}

const accounting = new Department("Accounting");
accounting.name = "Marketing";
accounting.addEmployee("Coco");
accounting.addEmployee("Deer");

// 컴파일 에러가 발생한다. public이여야 아래와 같이 코드를 기입할 수 있다.
accounting.employees[2] = "Emong";

✅ 약식 초기화
앞서, 클래스를 정의할 때 1. 속성 정의 2. 생성자 함수를 통한 속성의 default값 설정 과 같은 두 단계에 걸쳐 진행했다. 하지만, 이는 속성이 늘어날 수록 번거로워지기 때문에 하나의 단계로 축약하여 속성을 정의하고 기본 값을 설정할 수 있다.
1
2
3
4
5
6
7
8
9
10
11
12
13
14
15
16
17
18
19
class Department {
  private employees: string[] = [];

  // 이는 필드를 찾은 다음 값을 저장해야 하는 이중 초기화 코드를 한 번에 처리하도록 축약한 것이다.
  constructor(private id: string, public name: string) {
  }

  describe(this: Department) {
    console.log(`Department (${this.id}): ${this.name}`);
  }
  addEmployee(employee: string) {
    this.employees.push(employee);
  }
}

const accounting = new Department("d1", "Accounting");
accounting.name = "Marketing";

accounting.describe(); // Department (d1): Marketing
기존에 constructor함수를 통해 기본 값을 설정할 때는, 단순히 타입만 설정하면 되었다. 하지만 이것은 단순히 생성자에서 인수들을 가져올 뿐만 아니라 이 클래스에 대해 정확히 동일한 이름의 속성을 만들고 싶다는 것을 타입스크립트에게 알려야 하기 때문에 해당 속성이 public인지 private인지 명시해야 한다.
(2) readonly 제어자
private이나 public이어서도 안 되고 초기화 후에 변경되어서도 안 되는 특정 필드가 있는 경우 readonly제어자를 사용할 수 있다.
1
2
3
4
5
6
7
8
9
10
11
class Department {
  private employees: string[] = [];

  constructor(private readonly id: string, public name: string) {
  }

  addEmployee(employee: string) {
    this.id ="d2" // 컴파일 에러 발생
    this.employees.push(employee);
  }
}
이처럼 readonly는 특정 속성이 초기화되고나면 이후에는 변경되어서는 안 된다는 점을 명확히 하기 위해 사용된다. 이는 객체의 특정 속성에 대해 대체로 필수적으로 적용된다.
3) 클래스 상속
클래스는 생성 시, extends 키워드를 사용하면 다른 클래스의 속성 및 메서드를 상속받을 수 있다.
(1) super 키워드
extends키워드를 사용하여 클래스의 속성, 생성자 함수, 메서드 등을 상속할 수 있다.
1
2
3
4
5
6
7
8
9
10
11
12
13
14
15
16
17
18
19
20
21
22
23
24
25
26
27
28
29
30
31
32
class Department {
// 이는 필드를 찾은 다음 값을 저장해야 하는 이중 초기화 코드를 한 번에 처리하도록 축약한 것이다.
constructor(private id: string, public name: string) {
}
describe() {
console.log(`Department (${this.id}): ${this.name}`);
}
addEmployee(employee) {
this.employees.push(employee);
}
printEmployeeInformation() {
console.log(this.employees.length);
console.log(this.employees);
}
}
// Department를 상속받은 클래스: Department클래스가 가진 모든것을 자동으로 가져온다.
class ItDepartment extends Department {
admins: string[] = [];
constructor(id: string, admins: string) {
super(id, "IT");
this.admins = admins;
}
}
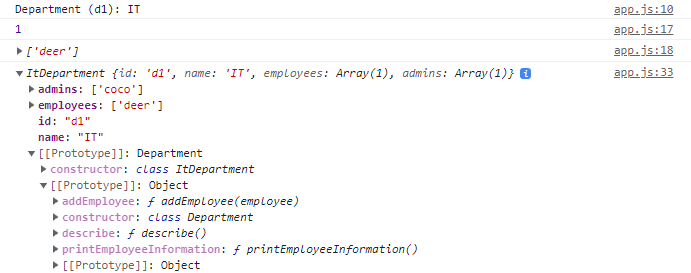
const it = new ItDepartment("d1", ["coco"]);
it.addEmployee("deer");
it.describe();
it.printEmployeeInformation();
console.log(it)
ItDepartment클래스의 경우 Department클래스로부터 상속을 받아 Department에서 정의한 속성과 메서드를 사용할 수 있다. 물론 본인이 원하는 속성과 메서드를 추가할 수도 있다. 그런데, 생성자 함수의 경우 재정의하기 위해서는 super키워드를 사용해야 한다.
여기서 super는 기본 클래스의 생성자를 호출하게 된다. 우선 부모 생성자의 경우 매개변수로 id와 name을 취하므로 super의 매개변수에 해당 요소들을 전달함으로서 기본 속성 값을 설정할 수 있다. 그 후, ItDepartment에서 추가할 속성을 할당하여 생성자 함수를 오버라이딩한다.
즉, 생성자함수를 오버라이딩하는 경우 super를 먼저 호출하고 this 키워드를 사용하여 작업을 수행해야 한다.
✅ 결과
(2) protected
protected는 앞서 배운 private와 비슷한 개념의 접근 제어자이다.
| 공통점 | 외부에서 접근할 수 없다. |
|---|---|
| 차이점 | **기본 클래스를 확장하는 클래스 내에서는 접근할 수 있는 지의 유무 **protected: 접근할 수 있다. private: 접근할 수 없다. |
1
2
3
4
5
6
7
8
9
10
11
12
13
14
15
16
17
18
19
20
21
22
23
24
25
26
27
class Department {
  // 만약 접근할 수 있으면서도 외부에서는 접근못하게 하려면 protected로 변경하면 된다.
  // private과 다른 점은 이 클래스에서뿐 아니라 이 클래스를 확장하는 모든 클래스에서도 사용 가능하다는 것이다.
  protected employees: string[] = [];

  constructor(private readonly id: string, public name: string) {
  }
};

class AccountingDepartment extends Department {
  constructor(id: string, private reports: string[]) {
    super(id, 'Accounting');
  }
  addEmployee(name: string) {
    if (name === 'Max') {
      return;
    }
    // employees가 private속성이면 컴파일 에러가 발생한다.
    this.employees.push(name);
  }
}

const accounting = new AccountingDepartment('d2', []);
accounting.addEmployee('Max');

// protected인 속성은 외부에서 접근할 수 없기 때문에 컴파일 에러가 발생한다.
accounting.Employee[0] = 'Manu';
만약 Department클래스의 employees 속성이 private였다면 이는 정의된 클래스 내에서만 접근이가능하며 해당 클래스로부터 상속받는 클래스에서는 접근이 불가능 하기 때문에 AccountingDepartment은 접근할 수 없다.
그러나 현재 protected속성을 사용하고 있기 때문에 외부에서 접근할 수 없게 하는 동시에 기본 클래스를 확장하는 클래스 내에서는 접근할 수 있게 한다.
(3) 추상 클래스
추상 클래스는 공통적인 동작을 정의하기 위해 사용되는 기술로 추상 클래스는 인스턴스를 생성할 수 없다.
추상 클래스는 일부 상위 클래스를 기반으로 하는 모든 클래스가 일부 공통 메소드 또는 속성을 공유하도록 하려는 경우 아주 유용하다. 추상 속성을 사용할 수도 있지만 동시에 구체적인 값, 구체적인 구현, 기본 클래스를 제공하지 않고자 한다면 상속하는 클래스가 이를 구체화 해야 한다.
일반 클래스의 규격을 지정하는 추상적인 클래스이다.
- 일부 메소드가 구현되지 않고, 선언만 되어있는 클래스로 자식 클래스에서 반드시 해당 메서드를 재정의 해야 한다.
- 즉, 메서드를 구체적으로 정의하지는 않고 메소드가 존재하도록 한다.
- 추상클래스는 추상적이기 때문에 인스턴스(객체)를 생성할 수 없다.
- 이는 상속되어야할 클래스이다.
1
2
3
4
5
6
7
8
9
10
11
12
13
14
15
16
17
18
19
20
21
22
23
24
25
26
27
28
29
30
31
32
33
// 추상 클래스
abstract class Department {
  protected employees: string[] = [];

  constructor(protected readonly id: string, public name: string) {
  }

  // 추상 함수
  abstract describe(this: Department): void;

  addEmployee(employee: string) {
    this.employees.push(employee);
  }

  printEmployeeInformation() {
    console.log(this.employees.length);
    console.log(this.employees);
  }
};

// 추상 클래스로부터 상속을 받는 클래스
class ITDepartment extends Department {
  admins: string[];
  constructor(id: string, admins: string[]) {
    super(id, 'IT');
    this.admins = admins;
  }

  // 추상 함수를 구체적으로 정의해야 한다.
  describe() {
    console.log('IT Department - ID: ' + this.id);
  }
};
4) 게터와 세터
이들은 로직을 캡슐화하고 속성을 읽거나 설정하려 할 때, 실행되어야 하는 추가적인 로직을 추가하는 데 유용하다.
(1) Getter
Getter는 값을 가지고 올 때, 함수나 메서드를 실행하는 속성이다.
1
2
3
4
5
6
7
8
9
10
11
12
13
14
15
16
17
18
19
20
21
22
23
24
25
26
27
28
class AccountingDepartment extends Department {
  private lastReport: string;

  // getter
  get mostRecentReport(){
    if (this.lastReport){
    return this.lastReport;
    }
    throw new Error("No report found.")
  }

  constructor(id: string, private reports: string[]) {
    super(id, 'Accounting');
    this.lastReport = reports[0];
  }

  addReport(text: string) {
    this.reports.push(text);
    this.lastReport = text;
  }
}


const accounting = new AccountingDepartment('d2', []);
accounting.addReport('Something went wrong...');

// 속성처럼 접근한다. accounting.mostRecentReport()처럼 메서드같이 사용하면 안된다.
console.log(accounting.mostRecentReport); //Something went wrong...
lastReport는 private로 지정되어 있어서 이 클래스내에서는 접근이 가능하지만, 외부에서 점을 표기하여 접근하는 것은 불가능 하다. 그러나 게터를 추가하여 접근이 가능하게 할 수 있다.
- 중요한 건 이는 메소드와 같아서 괄호 쌍과 중괄호 쌍을 입력해야 한다. 또한 코드 블록 내에 return을 입력해야 한다.
- 또한, 게터 메소드는 꼭 무언가를 반환하도록 작성해야 합니다.
getter속성을 정의하면 외부에서 점을 표기하여 값을 가져올 수는 없지만 이를 속성처럼 사용하여 속성에 접근하는 로직을 실행할 수 있다.
(2) Setter
Setter은 값을 설정할 때 , 함수나 메서드를 실행하는 속성이다.
1
2
3
4
5
6
7
8
9
10
11
12
13
14
15
16
17
18
19
20
21
22
23
24
25
26
27
28
29
30
31
32
33
34
35
36
37
38
class AccountingDepartment extends Department {
private lastReport: string;
// getter
get mostRecentReport(){
if (this.lastReport){
return this.lastReport;
}
throw new Error("No report found.")
}
// setter
set mostRecentReport(value: string){
if (!value){
throw new Error("Please pass in a valid value!")
}
this.addReport(value);
}
constructor(id: string, private reports: string[]) {
super(id, 'Accounting');
this.lastReport = reports[0];
}
addReport(text: string) {
this.reports.push(text);
this.lastReport = text;
}
}
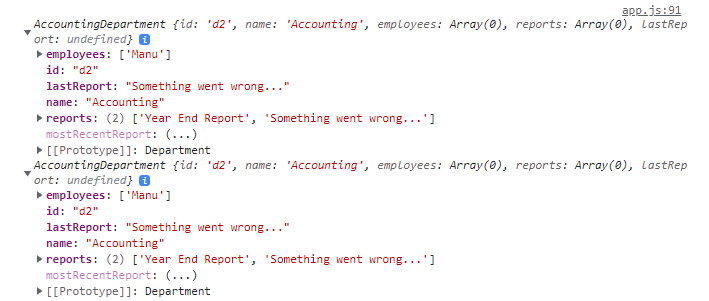
const accounting = new AccountingDepartment('d2', []);
// 속성처럼 접근한다.
accounting.mostRecentReport = "Year End Report";
accounting.addReport('Something went wrong...');
console.log(accounting.mostRecentReport);
5) 정적 속성과 메서드
정적 속성과 메서드를 사용하여 클래스의 인스턴스에서 접근할 수 없는 속성과 메서드를 클래스에 추가할 수 있다.
따라서 새 클래스 이름을 먼저 호출하지 않고 클래스에 직접 접근한다.
정적 속성과 메서드는 클래스를 기반으로 생성된 객체에서 파생된 것이 아니라 틀래스에서 직접 호출하는 메서드이다. 정적 속성과 메서드는 주로 논리적으로 그룹화하거나 클래스에 매핑하려는 유틸리티 함수나 클래스에 저장하고자 하는 전역 상수에 사용된다. 자바스크립트에 내장된 예를 살펴보면 우리가 정의하지 않더라도 원하면 브라우저의 자바스크립트 중 일부는 Math 생성자 함수나 클래스를 사용할 수 있다. 이러한 정적 속성과 메서드는 우리만의 클래스에도 추가할 수 있다.
1
2
3
4
5
6
7
8
9
10
11
12
13
14
15
16
17
18
class Department {
// 인스턴스화하지 않고 사용할 수 있도록 이 속성 앞이나 필드 앞에 static을 추가하여 접근할 수 있습니다.
  static fiscalYear = 2020;
  protected employees: string[] = [];

  constructor(private readonly id: string, public name: string) {
  }

  // 이 클래스를 인스턴스화 하지 않고 접근할 수 있는 정적 메서드로 만드려면 이 메서드 앞에 정적 키워드를 추가한 다음 객체를 반환해야 한다.
  static createEmployee(name: string){
    return {name: name};
  }
};

// new 키워드 없이 직접 클래스에서 호출하여 사용할 수 있다.
const employee1 = Department.createEmployee("Max");
console.log(employee1); // {name: Max}
console.log(Department.fiscalYear); // 2020
이렇게 static키워드를 활용하면, 인스턴스를 생성하지 않고도 해당 속성의 속성과 메서드에 접근할 수 있다. 이는 클래스 내부에서도 마찬가지이다.
1
2
3
4
  constructor(private readonly id: string, public name: string) {
    // console.log(this.fiscalYear) => 에러 발생
    console.log(Department.fiscalYear);
  }
클래스 내부에서 this키워드를 사용해서 정적 속성이나 메서드에 접근할 수 없다. 정적 속성은 인스턴스에서 유효하지 않다. 즉, 정적 속성과 정적 메소드의 전체적인 개념은 인스턴스와 분리되어 있기 때문에 this 키워드를 사용하여 접근하는 건 불가능하다. 만약, 클래스 내에서 정적 속성이나 메소드를 사용하고자 한다면 여기에 접근하기 위해 여기서 클래스 이름을 사용해야 한다. 이렇게 하면 클래스 내부에서도 정적 속성과 메소드에 접근할 수 있다.
6) 싱글톤과 private생성자
(1) 싱글톤 패턴
디자인 패턴 중 하나로, 클래스는 인스턴스를 정확히 하나만 갖도록 한다.
- 정적 메소드나 속성을 사용할 수 없다.
- 클래스를 기반으로 여러 객체를 만들 수는 없다.
- 항상 클래스를 기반으로 정확히 하나의 객체만 가질 수 있다.
(2) private 생성자
예를 들어, 회사 전체에 회계 부서는 하나만 있기 때문에 AccountingDepartment의 클래스가 하나의 인스턴스만 가지도록 한다면 new AccountingDepartment를 여러 번 수동으로 호출하지 않도록 하기 위해 생성자의 앞에 private 키워드를 붙여 private 생성자로 바꿀 수 있다.
1
2
3
4
5
6
7
8
9
10
11
12
13
14
15
class AccountingDepartment extends Department {
  private lastReport: string;

  private constructor(id: string, private reports: string[]) {
    super(id, 'Accounting');
    this.lastReport = reports[0];
  }

  describe() {
    console.log('Accounting Department - ID: ' + this.id);
  }
}

// 에러 발생
const accounting = new AccountingDepartment('d2', []);
그러나 private키워드를 사용하여 외부에서 new키워드를 활용해 인스턴스를 생성할 수 없다.

1
2
3
4
5
6
7
8
9
10
11
12
13
14
15
16
17
18
19
20
21
22
23
24
25
26
27
28
class AccountingDepartment extends Department {
  private lastReport: string;
  private static instance: AccountingDepartment

  private constructor(id: string, private reports: string[]) {
    super(id, 'Accounting');
    this.lastReport = reports[0];
  };

 // 정적 메서드의 this는 클래스 자체를 의미하기 때문에 this와 AccountingDpartment는 같다.
 // 그래서 AccountingDepartment.instace와 this.instance는 같다.
  static getInstance(){
    if (AccountingDepartment.instance) {
      return this.instance;
    }
    this.instance = new AccountingDepartment("d2", []);
    return this.instance;
  };

  describe() {
    console.log('Accounting Department - ID: ' + this.id);
  };
};

const accounting = AccountingDepartment.getInstance();
const accounting2 = AccountingDepartment.getInstance();

console.log(accounting, accounting2)
이를 해결할 정답은 정적 메서드이다. 클래스 자체에서 정적 메소드를 호출하여 인스턴스화할 필요가 없도록 하면 된다.
✅ 결과
섹션 5-2. 인터페이스
인터페이스는 일반적으로 객체의 구조를 설명할 때 사용된다.
클래스와 달리 청사진으로 사용하는 것이 아니라 사용자 정의 타입으로 사용된다. 즉, 구체적인 값이 아닌 구조만 있다.
1
2
3
4
5
6
7
8
9
10
11
12
13
14
15
16
17
18
19
20
21
22
23
interface Person {
  name: string;
  age: number;

  // 실제 메서드를 추가하는 것이 아니라 구조와 어떤 형태인지 설명을 추가한다.
  // 예시에는 phrase를 매개변수로 받고 아무것도 반환하지 않는 함수이다.
  greet(phrase:string): void;
}

// 객체의 타입을 확인하는 데 사용한다.
let user1: Person;

// 인터페이스의 정의를 충족했기에 유효한 객체이다.
user1 = {
  name: "Coco",
  age: 20,
  greet(phrase: string){
    console.log(phrase + '' + this.name);
  }
}

user1.greet("Hi there - I am ") // Hi there - I am Coco
1) 클래스와 인터페이스
(1) 클래스
인터페이스는 클래스나 객체가 특정 구조를 갖추도록 하고 객체의 형태에 대한 개념을 명확하게 설명하는 강력한 기능이다.
인터페이스는 주로 implements키워드를 활용하여 클래스의 구조를 설명하는 데 사용된다. 클래스의 상속에 비해 인터페이스는 여러 개의 인터페이스를 연결할 수 있기 때문에 더 활용도가 높다. 상속은 한 클래스로부터만 상속할 수 있지만 인터페이스는 쉼표로 구분하여 여러 개를 구현할 수 있으므로 하나가 있더라도 또 다른 인터페이스를 만들 수 있다.
또한, 인터페이스는 주로 구체적인 구현이 아닌 서로 다른 클래스 간의 기능을 공유하기 위해 사용된다. 즉, 클래스의 구조와 가져야할 기능을 인터페이스로 모듈화 한다. 이는 추상 클래스로 작업하는 것과 다소 비슷하지만, 인터페이스는 구현 세부사항이 전혀 없는 반면, 추상 클래스는 구체화 해야 하는 부분과 구현 세부사항이 혼재되어있다는 차이점이 있다.
1
2
3
4
5
6
7
8
9
10
11
12
13
14
15
16
17
18
19
20
21
22
23
interface Greetable {
  name: string;
  greet(phrase:string): void;
}

// implements: 인터페이스와 클래스를 연결한다.
class Person implements Greetable {
  name: string;

  constructor(n: string){
    this.name = n;
  }

  greet(phrase: string){
    console.log(phrase + '' + this.name);
  }
}

// user1에 저장한 Person 객체는 결국 Greetable인터페이스에 기반한 것이기 때문에 이렇게 작성해도 된다.
let user1: Greetable;
user1  = new Person("Coco")
user1.greet("Hi there - I am ") // Hi there - I am Coco
(2) readonly 제어자
인터페이스 내에 readonly 제어자도 추가할 수 있습니다. 다만 public, private 등은 지정할 수 없다.
인터페이스에서 사용할 수 없지만 readonly를 추가하여 읽기 전용으로 설정하여 객체가 초기화되면 변경할 수 없도록 할 수 있다.
1
2
3
4
5
6
7
8
9
10
11
12
13
14
15
16
17
18
19
20
21
22
23
24
25
26
interface Greetable {
  readonly name: string;
  greet(phrase:string): void;
}

class Person implements Greetable {
  name: string;

  constructor(n: string){
    this.name = n;
  }

  greet(phrase: string){
    console.log(phrase + '' + this.name);
  }
}


let user1: Greetable;
user1  = new Person("Coco")

// 에러 발생
user1.name = "deer"

user1.greet("Hi there - I am ") // Hi there - I am Coco
인터페이스를 클래스에 구현하고 나면 인터페이스가 영향을 갖게 된다. 클래스에서 readonly를 추가하지 않았음에도 클래스는 Greetable을 구현한다는 것을 인지하고 인터페이스 때문에 입력해야 하는 name 속성이 읽기 전용임을 자동으로 추론하기 때문이다.

(3) 상속
1
2
3
4
5
6
7
8
9
10
11
12
13
14
15
16
17
18
19
20
21
22
23
24
25
26
27
28
29
interface Named {
  readonly name: string;
}

// 인터페이스 상속도 가능하다. (클래스와 달리 둘 이상을 확장하는 것이 가능하다.)
// 여러 인터페이스로부터 상속을 받을 수 있다.
interface Greetable extends Named {
  greet(phrase:string): void;
}

class Person implements Greetable {
  name: string;

  constructor(n: string){
    this.name = n;
  }

  greet(phrase: string){
    console.log(phrase + '' + this.name);
  }
}


let user1: Greetable;
user1  = new Person("Coco")
// user1.name = "deer"

user1.greet("Hi there - I am ") // Hi there - I am Coco
(4) 옵션 속성
인터페이스, 클래스, 생성자 함수의 매개변수에 필요에 따라 선택적으로 적용되는 선택적 속성을 사용할 수 있다.
클래스는 설정된 인터페이스에 정의된 속성 또는 메서드를 반드시 사용하지 않고, 필요에 따라 선택적으로 사용하고 싶을 수도 있다. 이 경우 옵션(Optional) 속성 설정을 통해 사용자가 선택적으로 사용하게 설정하면 된다.
1
2
3
4
5
6
7
8
9
10
11
12
13
14
15
16
17
18
19
20
21
22
23
24
25
26
27
28
29
30
31
32
33
34
35
36
37
38
39
interface Named {
  readonly name?: string;

  /* 그런데 name 기반의 모든 클래스가 문자열이어야 한다고 설정하지 않고
   문자열이어야 하는지의 여부는 선택적으로 하고자 한다면, 속성 이름 다음에 물음표를 추가하여 선택적 속성을 지정할 수 있다.
   그러면 타입스크립트는 이 속성이 이 인터페이스를 구현하는 클래스 내에 있을 수 있지만 반드시 그렇지는 않다고 인식하게 된다. */
  outPutName?: string;
}

interface Greetable extends Named {
  greet(phrase: string): void;
}

class Person implements Greetable {
  name?: string;
  age = 20;

  constructor(n?: string) {
    if (n) {
      this.name = n;
    }
  }

  greet(phrase: string) {
    if (this.name) {
      console.log(phrase + "" + this.name);
    } else {
      console.log("Hi");
    }
  }
}

let user1: Greetable;

// 선택적 속성 덕분에 이제 값이 없어도 인스턴스를 생성할 수 있다.
user1 = new Person();

user1.greet("Hi there - I am "); // Hi!
2) 함수와 인터페이스
(1) 함수
사용자 정의 타입
1
2
3
4
5
6
type AddFn = (a: number, b: number) => number;

let add: AddFn;
add = (m1: number, n2: number ) => {
  return n1 + n2;
};
인터페이스
1
2
3
4
5
6
7
8
9
interface AddFn {
  // 화살표가 아닌 반환타입을 쌍점으로 표시
  (a: number, b: number): number;
}

let add: AddFn;
add = (m1: number, n2: number ) => {
  return n1 + n2;
};