
vue3환경에서 타입스크립트로 vuex를 사용하는 방법을 정리해보았다.
먼저, vuex4를 설치한다.
1
$ npm install vuex@next --save
1. 기본 준비
1) main.ts에 스토어를 세팅한다
1
2
3
4
5
6
7
import { createApp } from "vue";
import "./style.css";
import App from "./App.vue";
import router from "./router";
import store from "./store";

createApp(App).use(store).use(router).mount("#app");
store를 import한 뒤 store를 사용한다고 설정한다.
2) store 폴더를 생성한다.
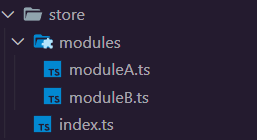
src에 store 폴더를 생성한다. vuex를 기능별로 모듈화해서 구현할 것이기 때문에 다음과 같은 폴더 구조를 가지고 있다.
store
modules
moduleA.ts
moduleB.ts
index.ts
2. store 설정
1) moduleA.ts
state도 타입을 설정해주어야 한다. state의 타입을 한 번에 설정하기 위해 interface를 사용한다.
1
2
3
4
5
6
7
8
9
10
11
12
13
14
15
16
17
18
19
20
21
22
23
24
25
26
27
28
29
30
31
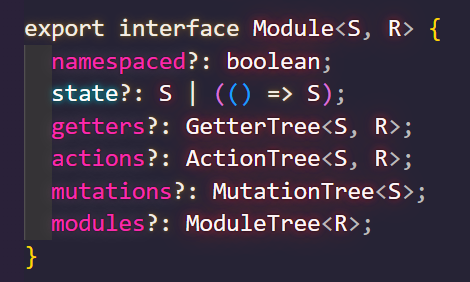
import { Module } from "vuex";
import { RootState } from "../index";
// 인터페이스를 사용하여 ModuleA의 State 타입을 설정한다.
export interface ModuleAState {
counter: number;
}
// state의 타입추론이 잘 되게 하기 위해 사용한다.
export const moduleA: Module<ModuleAState, RootState> = {
namespaced: true,
state: {
counter: 0,
},
getters: {
getCounter: (state) => {
return state.counter;
},
},
mutations: {
SET_COUNTER: (state, value) => {
state.counter = state.counter + value;
},
},
actions: {
plusOneCounter: ({ commit }) => {
commit("SET_COUNTER", 1);
},
},
};
- 미리 타입을 지정한 인터페이스를 Module 제네릭에 넣어준다.
- mouduleA의 state 타입을 정의한 moduleAState 인터페이스
- index.ts에 정의된
RootState인터페이스 (다른 모듈에 있는 state도 사용하기 위함이다.)
- vuex에서 import한 모듈 제네릭은 다음과 같다.
2) index.ts
분리한 module을 병합한다.
1
2
3
4
5
6
7
8
9
10
11
12
13
14
15
import { createStore } from "vuex";
import { moduleA, ModuleAState } from "../store/modules/moduleA"
import { moduleB, ModuleBState } from "../store/modules/moduleB";


// 모듈의 state를 공유한다.
export interface RootState {
  ModuleA: ModuleAState;
  ModuleB: ModuleBState;
}

// store를 생성한다.
export default createStore({
  modules: { moduleA, moduleB }
});
RootState: 모듈의 type을 공유한다.createStore: 모듈을 묶어서 store를 생성한다.
3. 컴포넌트에서의 사용
1) store 호출
composition API에서 store에 접근하기 위해서는 useStore함수를 호출하면 된다.. 이는 vue2에서 this.$store Option API를 사용하여 구성 요소 내에서 검색하는 것과 같다.
1
2
3
4
5
<script setup lang="ts">
  import { useStore } from 'vuex'
  const store = useStore()

</script>
2) state, getters, mutations, actions
component에서 store에 저장된 값을 불러들인다.
| store | component에서 사용 |
|---|---|
| state | computed(() => store.state.modules.name) |
| getters | computed(() => store.getters[moudles/name]) |
| mutations | store.commit("modules/name") |
| action | store.dispatch("moudles/name") |
1
2
3
4
5
6
7
8
9
10
11
12
13
14
15
16
17
18
19
20
21
22
23
24
25
26
27
28
29
30
<template>
  <div>
    <div> data: </div>
    <button @click="action"></button>
  </div>
</template>

<script setup lang="ts">
  import { computed } from "vue";
  import { useStore } from 'vuex'


  // 저장소
  const store = useStore()

  // state: computed
  const state = computed(()=> store.state.moduleA.counter)

  // getters: computed
  const getters = computed(()=> store.getters["moduleA/getCounter"])

  // mutations: commit
  const mutations = () => store.commit("moduleA/SET_COUNTER")

  // action: dispatch
  const action = () => store.dispatch("moduleA/plusOneCounter")

</script>

<style scoped></style>